


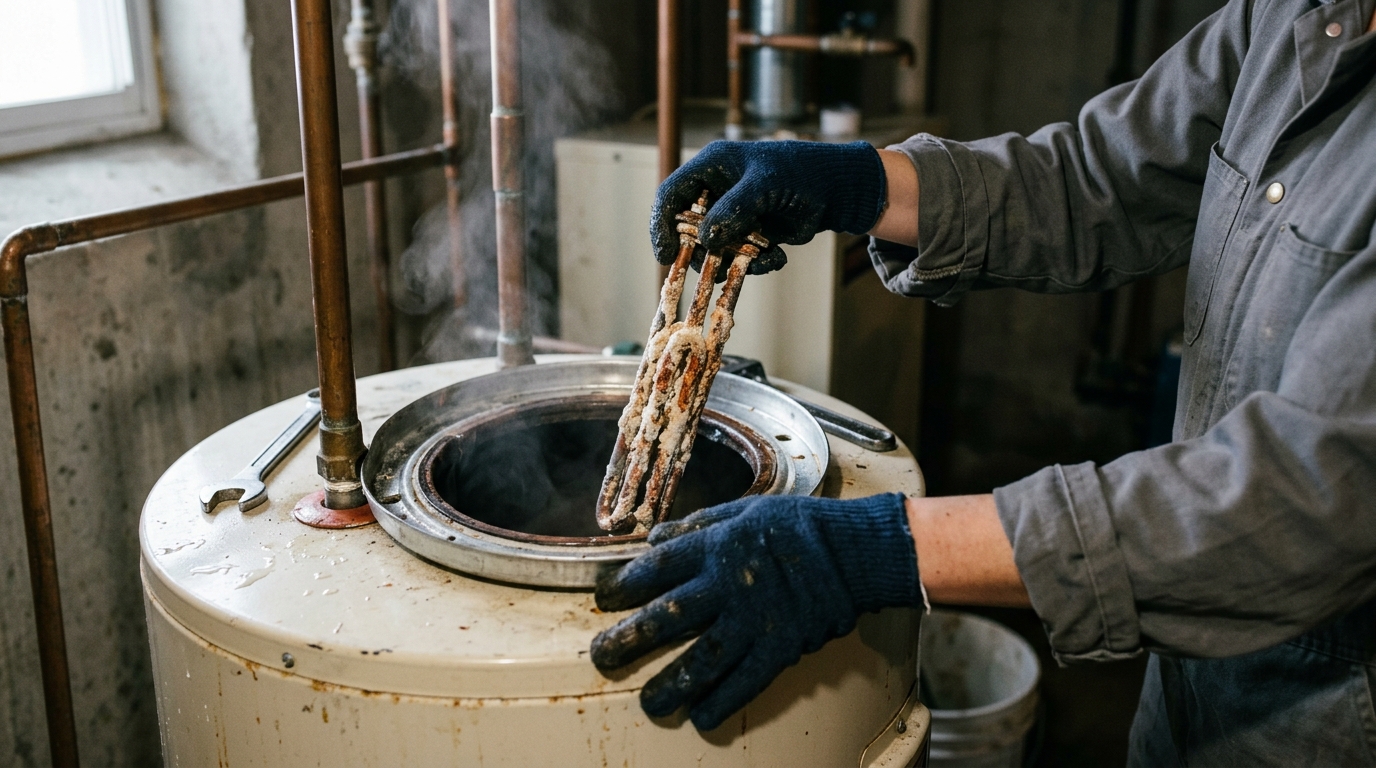
Cold showers, a rising energy bill, and a water heater that just won’t keep up—these are the frustrating signs that a heating element has failed and is quietly draining both your comfort and your wallet. Before you resign yourself to a costly technician visit or a premature tank replacement, know this: water heater element replacement is a manageable project most homeowners can tackle safely with the right guidance. Big Star Conservation INC. breaks down everything you need for 2026, from diagnosing the problem to picking an energy-efficient element that restores reliable hot water without wrecking your utility bill.
Understanding How Your Water Heater Element Works
Upper vs. Lower Elements Explained
Most electric water heaters use two heating elements. The upper element heats the top of the tank first, since most models draw hot water from there. Once that section hits the set temperature, the lower element kicks in and heats the rest. This staged setup gets hot water ready faster while spreading out electrical demand.
Each element has its own thermostat controlling when it switches on and off. If the upper one fails, you’ll likely get lukewarm water that runs out fast. If the lower one fails, you might get hot water at first, then a quick drop in temperature. Knowing which element handles which section helps you pinpoint the problem before you buy a part.
Screw-In vs. Bolt-On Element Types
Elements come in two main designs. Screw-in elements thread directly into the tank wall and need a special element wrench to remove. Bolt-on elements attach with a flange and four bolts, sealed by a gasket instead of a washer. Bolt-on styles show up mostly in older tanks; screw-in versions dominate newer ones.
Getting the type right matters. Install the wrong style and you risk leaks or a bad seal. Check your existing element’s mounting style, along with any water heater thermostat replacement needs, before you buy anything.
Watt Density and Why It Matters
Watt density measures how much heat an element produces per square inch of surface. High-watt-density elements heat water fast, but they scale up quickly in hard water and don’t last as long. Low-watt-density elements spread heat more gently, which cuts down on mineral buildup and stretches service life.
Pick the wrong watt density and you strain the whole system, which can leave you with an electricity bill too high for what you actually use. Match watt density to your local water conditions, and you protect the element while improving long-term efficiency.
Signs You Need a Water Heater Element Replacement
No Hot Water or Lukewarm Water
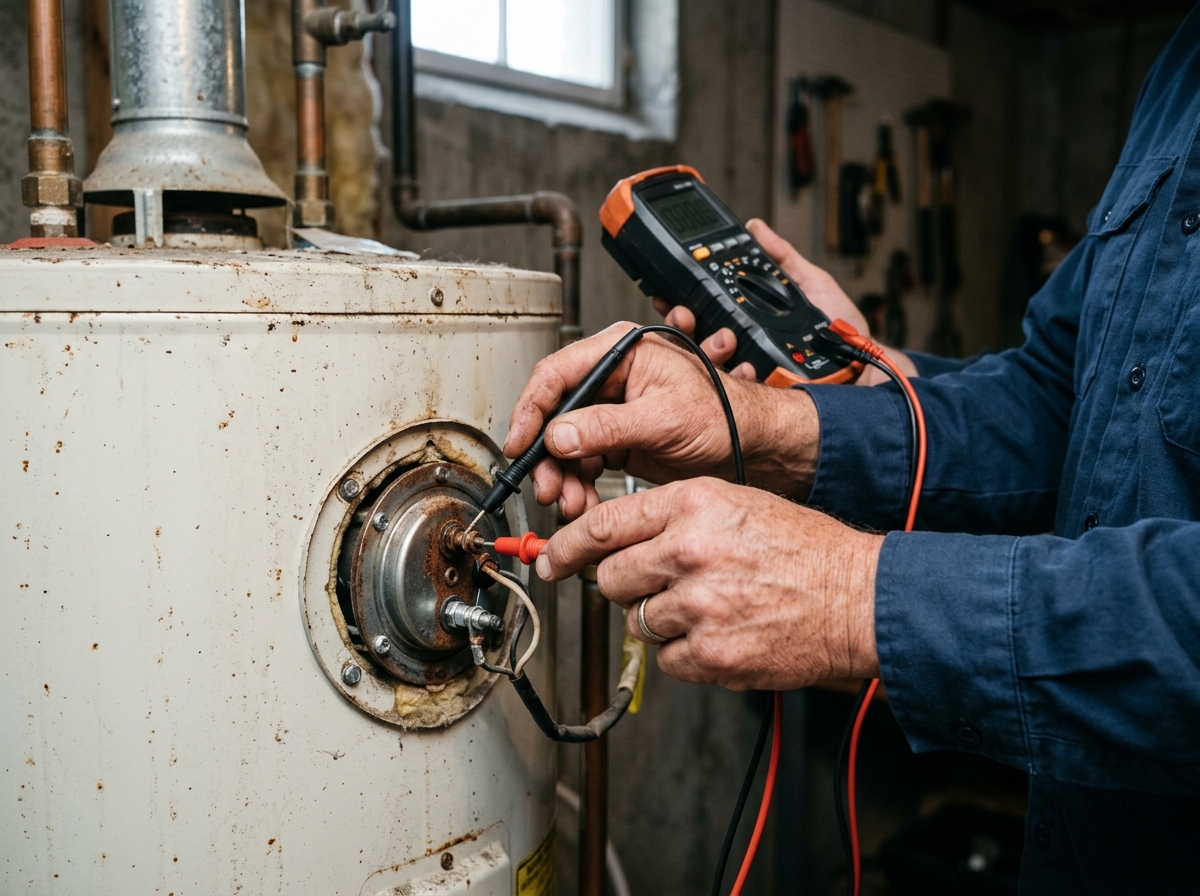
A failing element often shows up as water that never really heats, or heats briefly then turns cold. This is the most common warning sign. No hot water usually points to a burned-out element, not a whole-tank failure. A multimeter test can confirm this before you spend money on a new tank.
Tripped Breaker or Discolored Water
Electrical and water-quality clues matter too. A shorted element can pull too much current and trip the breaker again and again. Rusty or discolored water may point to element corrosion, though it can also mean a failing anode rod. Notice pressure problems too? A water heater relief valve replacement might be needed alongside the element work.
Strange Noises or Slow Recovery Time
Sediment buildup on a heating element creates noise and slows performance. Watch for these symptoms before booking a repair:
- Popping, rumbling, or crackling sounds coming from inside the tank during heating cycles
- Recovery time that takes noticeably longer than the unit’s original rated performance
- Water that runs hot briefly, then cools off much faster than expected
- Higher utility bills despite normal household water usage habits
- Visible scale or mineral buildup around the element when the access panel is removed
Rising bills tied to slow recovery are worth checking against current the cost of electricity in Louisiana rates. Compare past bills to today’s rates, and you’ll know whether the element—not pricing—is the real issue.
Tools and Supplies You’ll Need
Essential Tools Checklist
Gather your gear before you start. It saves time and skips the mid-job hardware store run. Most parts are cheap, and Water Heater Elements are sold right alongside gaskets and testers at most stores.
- An element wrench, which fits the hex-shaped element base and breaks the seal without stripping it.
- A multimeter to test continuity and confirm the old element has actually failed.
- A garden hose for draining the tank fully before removal.
- A bucket and towels to catch drips and protect your flooring.
- A new rubber gasket, since reusing an old one often causes leaks.
- Plumber’s tape for sealing threaded fittings on certain element types.
Choosing the Right Replacement Element
Match wattage and voltage exactly to your old element. Check whether your tank uses a screw-in or bolt-in style before you buy. Got a gas-fired unit? This project looks different—check the details on thermocouple water heater replacement instead.
Safety Gear and Precautions
Always cut power at the breaker before touching any wiring. Never trust the switch alone to be enough. Wear insulated gloves and safety glasses while draining hot water. Keep a flashlight close, since basements and closets rarely have good lighting for this task.
Comparing Popular Replacement Element Options
Low vs. High Watt Density Elements
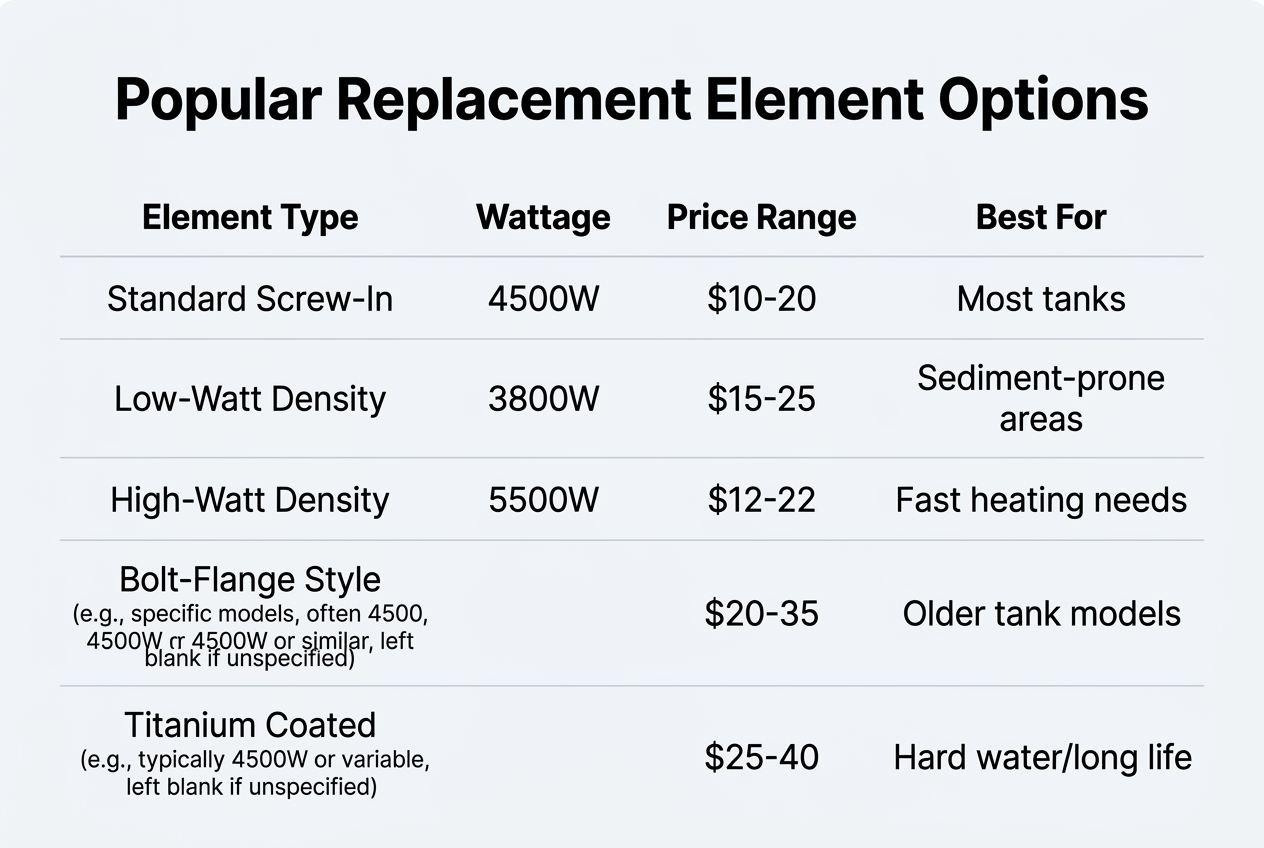
Low watt density elements spread heat over a longer surface, which cuts scale buildup and stretches lifespan. High watt density elements heat faster but wear out sooner in hard-water areas common across Louisiana and Mississippi. Most 4500-watt low density elements fit standard 240-volt residential tanks.
Copper vs. Stainless Steel vs. Chrome
Copper elements are cheap and conduct heat well, but they corrode fast in acidic water. Stainless steel resists corrosion and suits homes with treated water. Chrome-coated copper splits the difference, adding a protective layer against sediment damage. Homeowners planning a whole-home upgrade sometimes also check a thermocouple replacement guide pricing page, since related parts often get swapped during the same repair visit.
Price and Warranty Comparison
Below is a general comparison of common replacement elements based on material, wattage, and typical warranty length.
| Material | Wattage/Voltage | Price Range | Typical Warranty |
|---|---|---|---|
| Copper | 3800W / 240V | $8–$15 | 1 year |
| Stainless Steel | 4500W / 240V | $18–$30 | 3 years |
| Chrome-Coated Copper | 5500W / 240V | $15–$25 | 2 years |
| Low Watt Density Copper | 4500W / 240V | $12–$20 | 1–2 years |
Got a tight space or an odd-shaped tank? The Water Heater Straight “Hairpin” Element KIT is a flexible, budget-friendly option worth a look.
Step-by-Step Water Heater Element Replacement Process
Shutting Off Power and Draining the Tank
Start at the breaker panel. Flip off the circuit feeding the water heater, then test with a voltage meter to make sure power is really dead. Never skip this check. Next, close the cold water supply valve and connect a garden hose to the drain valve. Let the tank empty into a bucket or floor drain. This step keeps you safe from shock and scalding water for the rest of the job.
Removing the Old Element Safely
With the tank drained, pull the access panel and pull back the insulation to expose the wiring. Snap a photo of the wire connections before you disconnect anything. Loosen the element with a proper socket wrench, turning counterclockwise. Some tanks release trapped water at this point, so keep towels close. Got an older thermostat? Check thermostat replacement cost details before reassembling—a worn thermostat often fails right alongside the element.
The table below mirrors the numbered steps found in most manufacturer manuals.
| Step | Action | Tool Needed |
|---|---|---|
| 1 | Cut power at breaker | Voltage tester |
| 2 | Drain tank fully | Garden hose |
| 3 | Disconnect wires | Screwdriver |
| 4 | Remove old element | Element wrench |
| 5 | Install new element | Wrench, plumber’s tape |
Installing and Testing the New Element
Wrap the threads with plumber’s tape, then hand-tighten the new part before finishing with a wrench. Reconnect the wires exactly as photographed. Refill the tank completely before restoring power—skip this and the new part can burn out instantly. Look for a compatible Water Heater Element matching your tank’s voltage and wattage. Restore power, then check for leaks and proper heating within thirty minutes.
Troubleshooting Common Installation Problems
Reading Resistance with a Multimeter
A multimeter tells you if the new element is actually working. Set it to the ohms setting, then touch the probes to the two screw terminals on the element. A healthy reading usually falls between 10 and 16 ohms. Zero or infinite resistance means the element is faulty or wired wrong.
Getting no reading at all? Double-check your connections before you assume the part is bad. Loose wires cause more false failures than actually defective elements. For a detailed walkthrough of terminal placement, the guide titled Replace the Lower Heating Element – Whirlpool shows exactly where the probes should land.
Fixing Leaks Around the Gasket
Leaks around the element usually mean the gasket seated crooked or wasn’t tightened enough. Drain the tank again, pull the element, and check the rubber seal for cracks or pinches. Replace it if it looks worn at all.
Reinstall the element straight, then tighten the bolts in a star pattern, not a circle. This spreads pressure evenly and stops future drips. Snug is enough—overtighten and you can crack the gasket right away.
When the Breaker Keeps Tripping
A tripping breaker often means a short inside the element or damaged wiring. Check for scorch marks near the terminals—a problem also seen during a mobile home furnace replacement when old wiring overheats. Replace any brittle or blackened wires right away for safety.
DIY Replacement vs. Hiring a Professional
Cost Breakdown: DIY vs. Professional Service
Swapping a heating element yourself costs far less than hiring help. A replacement part runs $10 to $30. Professional service adds labor, often $150 to $300 total. The table below breaks down typical costs and time.
| Option | Parts Cost | Labor Cost | Time Needed |
|---|---|---|---|
| DIY Replacement | $10–$30 | $0 | 1–2 hours |
| Licensed Technician | $10–$30 | $140–$270 | 30–60 minutes |
| Emergency Call-Out | $10–$30 | $250–$400+ | Same day |
| Full Tank Replacement | $400–$1,200 | $150–$500 | 2–4 hours |
Risks of DIY Electrical Work
Water heaters run on 240-volt circuits. That’s enough current to cause serious injury if the breaker isn’t off. Wiring mistakes can also fry the new element or trip safety systems over and over. Similar risks show up in other home systems; the furnace inducer motor replacement guide covers comparable electrical hazards in HVAC work.
When to Call a Licensed Technician
Some situations call for professional help. Call an electrician if the breaker keeps tripping after replacement. Call a plumber if you spot corroded tank fittings or active leaks. If wiring makes you nervous, check the guide to Replace the Upper Heating Element before trying this alone. When in doubt, a licensed technician protects both your safety and your warranty.
Maintaining Your Water Heater to Prevent Future Failures
Flushing Sediment Buildup Regularly
Sediment is the top cause of early element burnout. Minerals in water settle at the tank bottom and bake onto the element surface. This layer acts like insulation, forcing the element to work harder and overheat. Over time, that stress cracks the metal sheath and the element fails.
Drain and flush your tank every six months. Turn off power, hook a hose to the drain valve, and run water until it comes out clear. Homes with hard water—common across Louisiana and Mississippi—may need quarterly flushing. This simple habit can add years to both the tank and its heating elements.
Testing and Replacing Anode Rods
The anode rod protects your tank from rust by attracting corrosive elements first. Check it yearly. If more than six inches of the core wire shows, or the rod is coated in calcium, replace it. A worn-out rod leaves your tank exposed to corrosion, cutting years off its lifespan.
A $20 anode rod is far cheaper than a new tank. This small task protects your whole investment and keeps warranty coverage valid on most units.
Setting the Optimal Temperature
Keep your thermostat at 120°F. Higher settings speed up mineral scaling and strain elements for no good reason. This one adjustment cuts standby energy loss and lowers your utility bill noticeably.
Proper temperature control also feeds into whole-home efficiency. Paired with insulation and weatherization upgrades, it cuts overall energy waste. Learn more about us and how these small changes add up to long-term savings.
Energy Efficiency Considerations After Replacement
How an Old Element Wastes Energy
A failing element doesn’t just heat water poorly. It also forces your water heater to work harder, longer. Mineral buildup and corrosion cut down heat transfer, so the unit cycles more often to hit the same temperature. Over time, that can push your energy bill up by 10 to 15 percent.
A fresh, correctly rated element restores efficient heat transfer right away. Many homeowners notice shorter recovery times and steadier hot water within the first week. That one small mechanical fix often produces a real, measurable drop in monthly energy use.
Insulating Your Tank and Pipes
Once the new element is in, insulation protects that efficiency gain. An insulating blanket wrapped around an older tank can cut standby heat loss by 25 to 45 percent, especially in garages or unconditioned spaces.
Pipe insulation matters too. Wrap the first three to six feet of hot and cold lines near the tank, and you cut heat loss during transport. This cheap, simple step keeps water hotter longer and means the element doesn’t need to fire as often.
Exploring Whole-Home Energy Assessments
Element replacement is just one piece of a bigger energy picture. A whole-home assessment finds drafts, poor insulation, and outdated appliances that also drive up costs. Many local businesses and utility programs offer these evaluations for little or no cost.
These assessments often turn up simple weatherization fixes—sealing attic gaps, upgrading duct insulation—that pair well with a new water heater element. For more practical guidance on efficient home upgrades, check out our blog for detailed articles and seasonal tips.
Frequently Asked Questions About Water Heater Elements
How Long Does an Element Last?
A typical element lasts 6 to 10 years. Hard water shortens that lifespan by coating the coil in mineral scale. Homes with softeners often see elements last closer to 12 years. Sediment buildup and constant high demand—think large families running back-to-back showers—wear elements out faster too.
Can I Replace Only One Element?
Yes. Most tanks have two elements, and you can replace just the one that failed. Consider these points before deciding:
- The lower element usually fails first because it works hardest during daily heating cycles.
- Replacing both at once saves a second repair trip if the other is close to failing.
- Mismatched wattage between old and new elements can cause uneven heating or tripped breakers.
- Elements are cheap, often under $20 each, so pairing them rarely costs much more.
Is It Safe to Replace Without Draining the Tank?
No, this isn’t safe. Full drainage prevents scalding leaks and lets you inspect the tank for corrosion. Skip proper prep—like checking the benefits of insulating your attic area near the unit—and you can hurt overall energy performance after the fix.
If your water heater is due for a new element or you’re simply looking to cut down on energy costs, Big Star Conservation Inc. can help. Through partnerships with regional utility companies, they provide expert energy assessments and weatherization services to homeowners and multi-family property owners across Louisiana and Mississippi at little to no cost. Reach out today to book an assessment and see how much you could save.
